Isometric style
Isometric style illustrations have unique properties and can sometimes be difficult to achieve. The following production guidelines can help you through the technical details.
Workspace setup
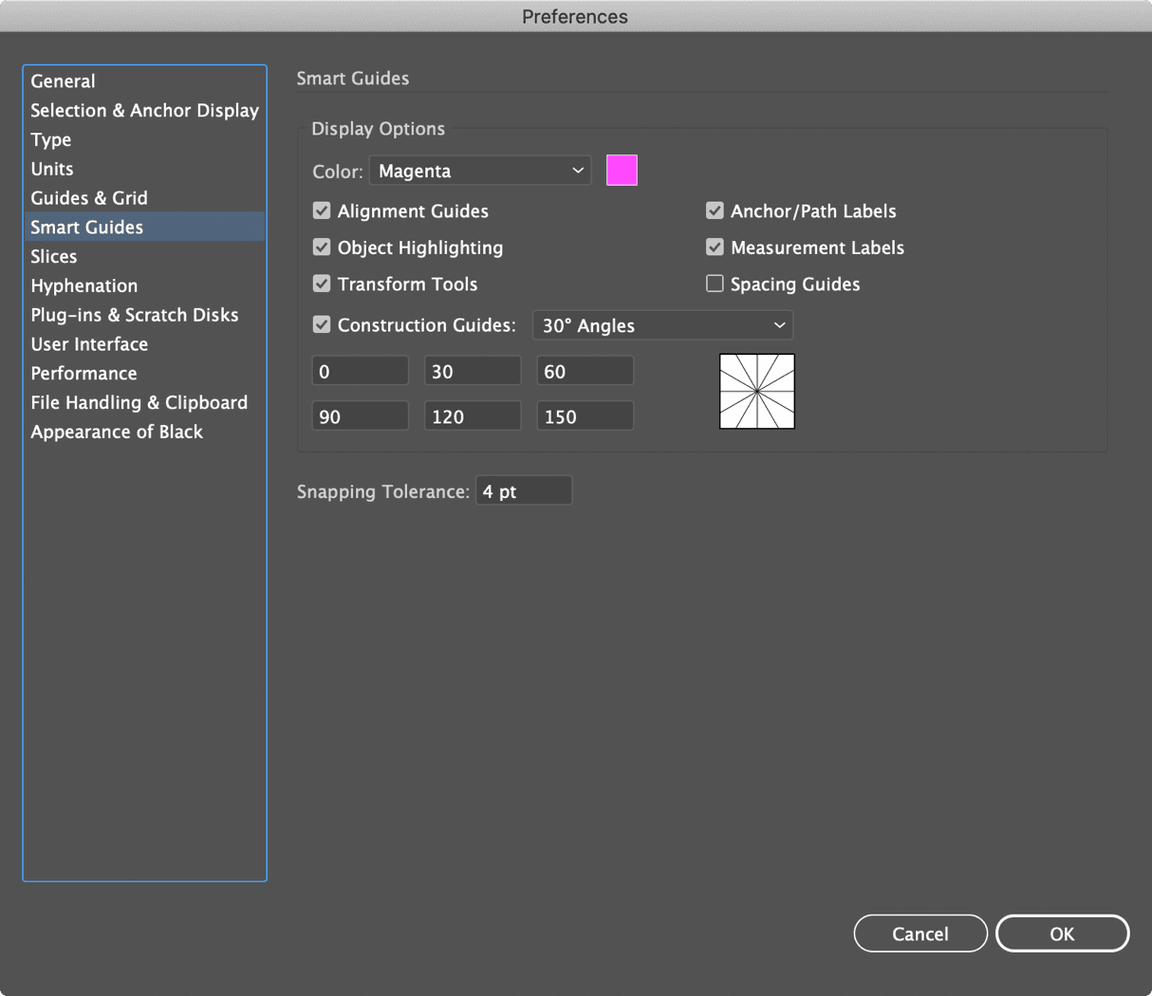
The isometric grid behaves differently than the Adobe Illustrator grids you may be used to. Here are a few workspace specifications that makes it easier to align your artwork properly to the grid.
- Turn on snap to point.
- Turn off snap to grid and snap to pixel.
- Under
(Illustrator > Preferences), use the following specifications for Smart Guides:

Creating perspective
Perspective can be simulated with simple, rectilinear shapes built on the isometric grid. However, more complex objects, such as circles and 2D content on surfaces, can require additional techniques. Here are some ways to transform objects and create perspective.
Automated object transformations
- Download the isometric style starter kit (coming soon).
- Double-click the
Isometric Transformations.aiafile to install the Adobe Illustrator actions. - Open the Actions palette by navigating to
(Window > Actions). - Place any 2D object that you want to transform into a square or rectangle. The dimensions of the bounding square or rectangle should be multiples of 8px so that it will snap to the grid once transformed.
- Select the desired transformation from the Actions menu and click Play.
Manual object transformations
- Place any 2D object that you want to transform into a square or rectangle. The dimensions of the bounding square or rectangle should be multiples of 8px so that it will snap to the grid once transformed.
- Perform the transformations
Scale,Shear, andRotatelocated in the(Object > Transform)menu. Use the settings in the table below.
| Direction | Vertical scale | Shear | Rotate |
|---|---|---|---|
| Left-facing | 86.6% | -30° | -30° |
| Top-facing | 86.6% | 30° | -30° |
| Right-facing | 86.6% | 30° | 30° |
Before
After (left-facing)
3D effects
In most cases, we recommend against using Adobe Illustrator’s 3D effects. The reason is that the 3D effects can yield unexpected results, or objects that don’t easily adhere to the grid. However, some objects may require 3D effects, such as Revolve and 3D Extrude & Bevel.
- Select the 2D object to which you will apply 3D effects.
- Navigate to
(Effect > 3D)and choose a 3D effect. - In the 3D effect options, choose one of the isometric settings for the
Positiondropdown. - In the
Surfacedropdown, choose No Shading . - Expand the object with
(Object > Expand Appearance). - Apply your own shading using colors from the IBM color palette.
Rounded objects and depth
Simulating dimension with rectilinear objects is rather straightforward, but objects with rounded edges can be tricky. Any rounded object, whether it’s a rounded rectangle or a circle, can be constructed using cylinders. From there, it is easy to combine cylinders with rectangular prisms to make rounded rectangles with depth.
Drawing a cylinder
- Draw a circle and square with the same dimensions. The dimensions should be multiples of 8px so that it will snap to the grid once transformed.
- Draw an “X” over the bounding square.
- Group the objects and transform them in the desired direction.
- Copy the transformed object and paste it along the grid in the direction of of the depth.
- With the Pen Tool, draw a polygon connecting the intersections of the circles and the diagonal lines.
- Copy the circle on the surface.
- Select both circles and the polygon and
Addthem together using the(Window > Pathfinder)palette. - Paste the circle in place with
(Edit > Paste in place).
Animation workspace setup
The isometric grid behaves differently than the Adobe grids you may be used to. A complete guide on how to work with isometric illustrations in Adobe Illustrator can be found on the Isometric style design page. Additional setup tips and tricks can be found below.
Planes and flat surfaces
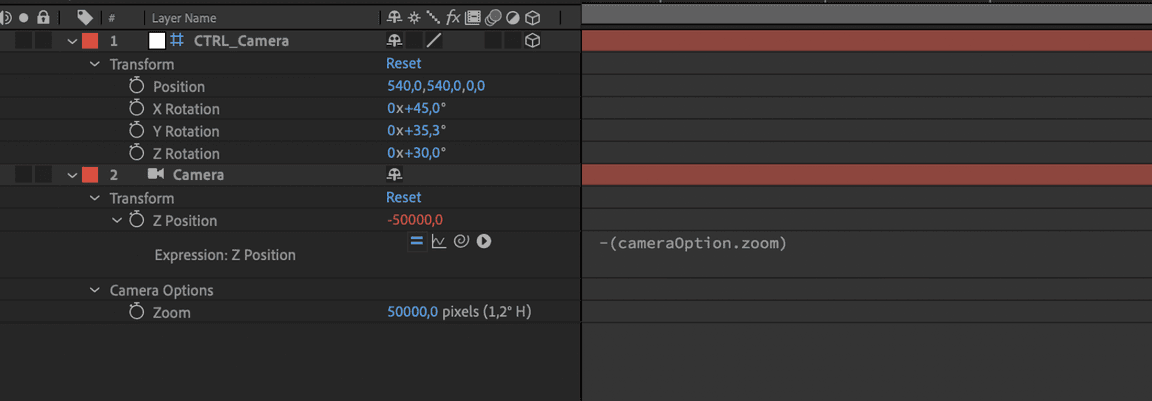
Elements that appear to be volumetric should generally be treated as flat illustrations in Adobe After Effects, while planes and elements constructed from flat surfaces can be made with 3D layers. To match the isometric grid, the following camera settings can be used. Linking up the z-position to the negative zoom value allows you to use a very long lens to flatten the perspective.
When making elements in 3D software outside of After Effects, please change the camera settings to isometric.
After Effects Specifications:
| Null object | Position | Rotation | Scale |
|---|---|---|---|
| 0.00 | 45° | 100% | |
| 0.00 | 35.264° | 100% | |
| 0.00 | 30° | 100% |
| Camera | Position | Rotation | Scale |
|---|---|---|---|
| 0.00 | 0° | 100% | |
| 0.00 | 0° | 100% | |
| -(cameraOption.zoom) | 0° | 100% | |
| Camera zoom | 50,000 |

Light and shadow
Color and gradients help define the depth, volume and overall look of the isometric style. It’s important to keep in mind how physical light works and ensure that your shadows behave accordingly.